
Security Reminder
Keep your SAS URL secure! Avoid sharing it with unauthorised individuals, as anyone with the link can perform the permitted actions. Renewing the SAS Token
Install Azure Storage Explorer
- Open the Company Portal (press the Windows key and search for “Company Portal”).
- Search for “Azure Storage Explorer” and install it.
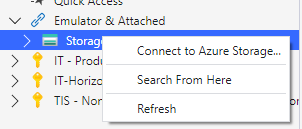
Connect to Azure Storage
- In Emulator & Attached, right-click on Storage Accounts.
- Select Connect to Azure Storage….
- A new window will appear.
- Under Connect to Azure Storage, select ADLS Gen2 Container or Directory.

- Choose Shared Access Signature (SAS) as the connection method.
- Enter a display name for the connection (this is for your reference).
- Paste the provided SAS URL (example below)
https://bmtdwhuksstrdev.blob.core.windows.net/hubspot?sp=racwl&st=2024-04-29T10:23:02Z&se=2024-10-22T18:23:02Z&spr=https&sv=2022-11-02&sr=c&sig=lAqJZk%2BoUHFZYhXlI####1Dg17hpgAhM%3DA SAS (Shared Access Signature) URL provides secure, delegated access to resources in an Azure Storage account. The SAS URL grants specific permissions over a defined period.
- Click Next, review your details, and click Connect.
Uploading Files to Azure Blob Storage via Azure Storage Explorer
Navigate to the Blob Container
- In the Explorer panel, expand the storage account you just connected to.
- Expand Blob Containers and click on the container (e.g.,
hubspot) you want to upload files to. - Select the Import folder
Upload Files
Method 1: Using the Upload Button
- With the blob container open, click the Upload button at the top of the window.
- A drop-down menu will appear. Select Upload Files (if uploading individual files) or Upload Folder (if uploading a folder).
- In the file browser window that opens, navigate to the file(s) or folder you want to upload, select it, and click Open.
- The file(s) will be uploaded, and a progress bar will show the upload status.
Method 2: Copy-Paste Files
- Open the folder on your local machine where the file(s) are stored.
- Select the file(s) you want to upload, right-click, and select Copy (or press
Ctrl+Con your keyboard). - In Azure Storage Explorer, right-click inside the container window and select Paste (or press
Ctrl+V). - Your file(s) will start uploading, and a progress bar will display the upload status.
Verify Upload
Once the upload completes, you should see your file(s) listed in the blob container. You can verify the upload by refreshing the container view or checking the file’s details (e.g., file size, upload time).
Troubleshooting Common Issues
- Invalid SAS Token: Ensure that the token hasn’t expired and that it includes the correct permissions for your actions (e.g., read, write, list). Renewing the SAS Token
- Access Denied: Double-check that you are connected to the correct Azure Storage account and container.